Sunday, July 11, 2010

White Clam Pizza, Fish Cheeks and Lobster Rolls - Oh My!


I recently took a road trip with youngest 17-year-old son to visit friends in Narragansett, Rhode Island. When my family does road trips we rarely stop at the highway rest stops for meals, rather off-the-road places..........usually a place that represents food well known to that geographical area. If we can't find local culinary delights a diner or something similar is a close second. On our way up to Rhode Island we had to pass through Connecticut. A friend of mine from a foodie forum I belong to raved about Pepe's Pizza in New Haven and Fairfield, CT. She happens to live in CT. Another friend from home (in PA) stops at Pepe's on his travels when passing through the Constitution State on Route I-95. So, we had the luxury of tasting Pepe's White Clam Pizza here in PA when he would bring a pie or two home. Thanks to my son's Iphone and our friend Harriet (Navigation System) we were able to look up exactly where Pepe's was located, enter the address on to Harriett and determine how long it would take us to arrive at our destination for fresh from the oven white clam pizza. We decided to stop at the Fairfield location as we were very ready for lunch. The pizza was mouth-watering......white pizza with a crispy thin crust loaded with whole fresh sweet clams and mozzarella cheese. Words cannot describe how yummy this was.


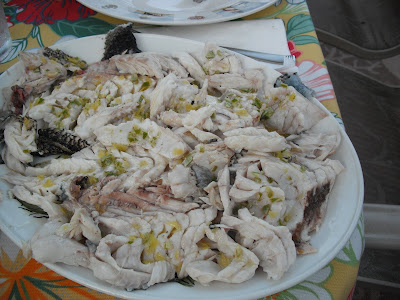
Our first full day in Narragansett started with conversation between my friend and I regarding what would be on the dinner table that evening. He and I both love to talk food and cook. We discussed this over his wonderful coffee he made in their French Press with freshly roasted and ground Ethiopian coffee beans - what a way to welcome a perfect beach day! It was decided that he would head to the local fish monger and buy whatever recently came out of the waters over at Point Judith. He went down to the fish monger and came back with two whole beautiful looking fresh-as-ever sea bass. These were placed in the fridge and a group of us headed off to Narragansett town beach for the day armed with our cooler of lunches, snacks and beverages and beach towels and chairs. Late afternoon we returned to the beach house and my friend and I headed to the grocery store. We decided on our side dishes (he made an array of fresh grilled veggies and I made a Quinoa salad.

Lovely Narragansett Town Beach and Point Judith Lighthouse at dusk:


Did you ever eat fish cheeks? I never had but based on the recommendation of our friend I decided to sample and what a sweet and tender fillet of fish are inside of the cheek. You can see the sweet fish fillet from the cheek here:


On our way home while driving once again through Connecticut we stopped in Mystic Seaport for lunch. We were in heaven eating on the water at a clam shack indulging in lobster rolls and an order of fries. We did stop in Fairfield, CT and called ahead for a take-out clam pizza - this time with red sauce to bring home to my husband for dinner, many thanks to good ole' Harriett and my son's IPhone! I love New England in the summertime!

Saturday, July 3, 2010

Panzanella


I love this Ina Garten recipe. Panzanella is Italian bread salad, often made with bread that has been sitting a few days. This salad screams summer with the fresh tomatoes and basil added. This recipe yields about 12 servings. Best eaten the day it is made or the bread will get soggy the longer it sits.

Ingredients

3 tablespoons good olive oil
1 small French bread or boule, cut into 1-inch cubes (6 cups)
1 teaspoon kosher salt
2 large, ripe tomatoes, cut into 1-inch cubes
1 hothouse cucumber, unpeeled, seeded, and sliced 1/2-inch thick
1 red bell pepper, seeded and cut into 1-inch cubes
1 yellow bell pepper, seeded and cut into 1-inch cubes
1/2 red onion, cut in 1/2 and thinly sliced
20 large basil leaves, coarsely chopped
3 tablespoons capers, drained

For the vinaigrette:
1 teaspoon finely minced garlic
1/2 teaspoon Dijon mustard
3 tablespoons Champagne vinegar
1/2 cup good olive oil
1/2 teaspoon kosher salt
1/4 teaspoon freshly ground black pepper


Directions
Heat the oil in a large saute pan. Add the bread and salt; cook over low to medium heat, tossing frequently, for 10 minutes, or until nicely browned. Add more oil as needed.


For the vinaigrette, whisk all the ingredients together.


In a large bowl, mix the tomatoes, cucumber, red pepper, yellow pepper, red onion, basil, and capers. Add the bread cubes and toss with the vinaigrette. Season liberally with salt and pepper. Serve, or allow the salad to sit for about half an hour for the flavors to blend. We enjoy this served at room temperature.


Cured Salmon


Cured salmon, also known as Gravlox, smoked salmon (without the smoke), lox or nova scotia salmon can easily be made in one's own kitchen with very few ingredients and very little effort. A pound of lox or nova can cost upwards of $30.00/lb. Make it at home for half the price!

Go to your trusty fish monger and buy a piece of salmon that is preferably wild-caught with a generous amount of fat. Have him/her slice a piece from the middle (not towards the head or tail) and its important to leave the skin on. Here is my piece of salmon ready to be cured and with the ingredients needed for the process:


Ingredients

1 pound wild-caught salmon (Norwegian or Alaskan preferred)
2 T kosher salt
1 T granulated sugar

Directions

Place salt and sugar in a ziplock bag and shake. Put salmon in bag and place on a plate in the refrigerator. Place another plate atop salmon and then weigh the top plate down (I weighed in down with a gallon of milk). Let sit, turning the bag occasionally at least for 24 hours. After salmon has cured, remove from refrigerator and bag. Rinse the salmon under cold water and then pat dry with paper towels. Once the salmon is dry, rub some vegetable oil over the top. Then slice as needed. I like to use a cheese knife to slice the salmon - works best here. Whatever knife is used, it must be sharp and slice the salmon horizontally.

Ready to be placed in the refrigerator:

Finished curing:

Thursday, July 1, 2010

Lowfat Blueberry Muffins


This recipe is from America's Test Kitchen. I love the fact that they are not overly sweet. They are as moist as ever and I don't feel like I'm eating a piece of cake when eating these muffins. I like muffins to taste like muffins, not cupcakes.

Ingredients

forgot to add sugar to this pic:


Vegetable oil spray (I used Bakers Joy)
1 cup cake flour
2 cups plus 1 T all-purpose flour
1 cup sugar, plus 1 T for sprinking (I did not sprinkle)
1 T baking powder
1/2 t baking soda
1/2 t salt
4 T (1/2 stick) butter, softened
2 large eggs
2 t fresh lemon juice
1 t grated fresh lemon zest
1 t vanilla extract
1 1/2 cups plain LOW-FAT yogurt (do not use NON-fat-muffins will be dry)
2 cups fresh or frozen blueberries (I used fresh) NOTE - ATK prefers frozen wild blueberries)

Directions

1. Place oven rack in middle position and heat oven to 375. Spray a 12-cup muffim tin with vegetable oil spray.
2. Whisk 2 cups all-purpose flour, cake flour, 1/4 cup of the sugar, baking powder, baking soda and salt together in a medium bowl. In large bowl, beat 3/4 cup more sugar and butter together with an electric mixer on medium speed until light and fluffy, 3 to 6 minutes. Beat in the eggs, one at a time, until combined, about 30 seconds. Beat in the lemon juice, lemon zest, and vanilla until incorporated, scraping down the bowl and beaters as needed.
3. Rduce the mixer speed to low. Beat in ond-third of the flour mixture and half of the yogurt. Repeat with half of the remaining flour mixture and the remaining yogurt. Beat in the remaining flour mixture until just incorporated. DO NOT OVERMIX!
4. Toss the blueberries with the remaining tablespoon of all-purpose flour, then gently fold them into the batter with a rubber spatula. Using a 1/3-cup measuring cup sprayed with vegetable oil spray, portion the batter into each muffin cup, then portion any remaining batter evenly among the cups using a small spoon. Sprinkle the tops with remaining tablespoon of sugar. Bake until golden and a toothpick insserted in the center comes out with just a few crumbs attached, 25 to 30 minutes.
5. Let the muffins cool in the pan for 5 minutes, then flip out onto a wire rack and let cool for 10 minutes before serving.